http://scrap-utopia.blogspot.com.auhttp://scrap-utopia.blogspot.com.au/p/scrapbooking-resume.htmlhttp://scrap-utopia.blogspot.com.au/p/gallery.htmlhttp://scrap-utopia.blogspot.com.au/p/design-teams.html

Wednesday, April 29, 2015

Pattern Stitching Tutorial
(for Off the Rails Scrapooking)


I am so excited to be sharing with you my first tutorial post 
as DT member on the Off the Rails Scrapbooking blog today!

You've probably already seen my layout HERE on the mid-month DT reveal on April 15th,
inspired by the beautiful green and pink mood palette, and you might have wondered 
how I created the stitched hexagon design on my background. 


Well, visit Off the Rails Scrapbooking right HERE to find out!

Here are some sneak peeks of my tutorial post.


Stitching just gives any project that extra creative touch 
that says 'handmade from the heart'. :)


Friday, April 24, 2015

DT Reveal & Photo Tutorial
for Scrap Around the World


You've all seen the gorgeous sea-inspired Mood Board
from Scrap Around the World revealed on April 1st.

Well, there is a good reason why I hadn't shared with you my project inspired
by this mood board yet, and that is because I was saving it for a special tutorial post
 that went live today on the SATW blog!  

Yes, I will give you step by step instructions on how I created this canvas!


Let's take a look at the beautiful April mood board,
designed by Hera Sugitani from the very sunny Brazil!


It is very obvious what inspired me from this set of gorgeous Summer images!
Being fortunate enough to live near the sea, it is a constant inspiration for me... the deep blue tones, the warmth of the sand, the mysterious sea creatures.

Here are some of the creating tips I've decided to share with you
here and on my very own tutorial post right HERE at Scrap Around the World!

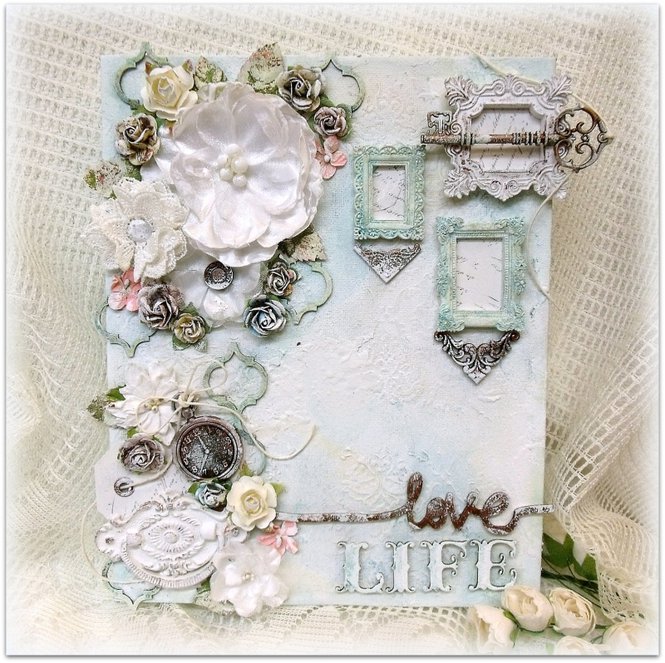
1. I started off with a not so pretty 12" x 8" wooden plank frame bought at my local Dollarstore which I covered with at least 3 thick coats of white gesso.


2. After my base coats of gesso were completely dry, I then used different shades of distress inks and spread it across my background using a scrunched up paper towel. 


3.  I like that the texture of the paper towel transfers on to the background.  The splatters look like they came from a mist bottle, but unlike with mist, the ink patterns are much easier to control when you create them yourself with a towel. 


4.  Next, I decided to add some more texture using thick modeling paste and a stencil. 


5. Wanting to add more earthy tones to my frame, I misted a few brown and beige hues from my collection of Tattered Angel Glimmer Mists and then dried my base with a heat gun.


6. Wanting to make the sea blue pop out a bit more, I added a few more drops of 'Stormy Sky' Distress Ink and brushed it in thick vertical strokes with a foam brush already coated with a thin layer of white acrylic paint.


7. My base finished, it was then time to have fun transforming all the pretty 2Crafty chipboard I chose upon for my canvas.  In order to achieve the sea foam effect on the Surfy Wave pieces, I started by adding a thick coat of clear gesso and heating it up with a heat gun, until it created bubbles on the surface of the chipboard.  Next, I put a generous coat of Martha Stewart Sparkle Texture paste. I then dabbed the chipboard with the same different blue distress inks as the background, adding some white paint on the top tips and Silks acrylic glaze on the bottom edge.


8. It was then time to affix my picture, and all embellishments on to my canvas.  I then finished off with my signature style white washing which I use on pretty much all my creations.  I created the white washing effect using a sponge dabber and white acrylic paint, dabbing the paint soaked sponge over everything, even the edges of my picture. 


Let's take a look at some close-up images...


Some of the products used:


 SUPPLIES LIST

Art Alternatives Acrylic Gesso
Liquitex Clear Gesso
Liquitex Professional Modeling Paste
Prima Marketing Inc stencil
Martha Stewart Sparkle Texture Effect
Tim Holtz Ranger Distress Ink
(stormy sky, tumbled glass & scattered straw)
Tattered Angels Glimmer Mist
(suede, tattered leather & wheatfields)
Silks Acrylic Glaze (azurite)
DecoArt Crafter's Acrylic white paint
2Crafty Chipboard
(surfy waves, chain lengths, line words-summer borders & seashells)
Prima Marketing Inc Shabby Chic Treasures
Recollections Floral Embellishments
Cousin Designs By Me Charms
Wooden plank canvas, netting & cheesecloth

You still have a few days left to play along with this wonderful challenge
for a chance to win 1 of 12 monthly prizes!!!

Click HERE for all the details on this month's mood board challenge!


Wednesday, April 22, 2015

Love These Cute Faces
(SOS DT Reveal Stash #26)


Time does fly by, doesn't it!?

It's already almost the end of April and time for another DT reveal for Scrap Our Stash
this time inspired by Sketch challenge #26 which is combined with an image board this month!


This month's SOS Sketch Artist is Laura Whitaker.

As mentioned above, this challenge is to create a layout inspired by Laura's sketch
and the inspiration photo provided below.


Let's take a look at what this challenge inspired me to create!


 It was a pleasure creating this layout based on Laura's pretty sketch and the fun ecclectic 
mood board. The first thing that caught my eye was the image of the black and 
white striped cloud so I started with a similar pattern as my background.    


Pretty much all stash used comes from the Flea Market collection from Crate Paper 
which I found matched very well with the feel and the colours of the pictures.


I also added a lot of gold accents and lots of sequins to 
match the lamp base and the confetti on the mood board.


And last, but not least, the photo I used features my nieces showing off their adorable 
painted faces which represent the image of the painting in the top right corner. 


Make sure to link your layout on the SOS blog right HERE by April 29th
for a chance to win this month's prize sponsored by Creative Embellishments.


Tuesday, April 21, 2015

Be Yourself Mixed Media Frame
(Prima April PPP & lots more)


So you have all heard about it?!
Prima Marketing Inc looking for some new designers
 (learn about their annual DT call right HERE
and everyone is talking about it... wishing, hoping, dreaming that they make the cut 
as designing for such a company as Prima would be any serious scrapper's dream come true!

Well, I'm no exception!

So today, I'll be sharing with you some Prima-based projects,
in hope that you and the good Prima folks like what you see!

Let's start with a brand new project, never before seen...


If you're familiar with the Prima monthly challenges, you will recognize 
the beautiful Spring colours of the April PPP inspiration board.


Inspired by these gorgeous colors and all the shabby chic feel of the images,
I decided to alter a 12" x 6" frame, to turn it into a lovely display of the style of scrapbooking
that I love the most and that best fits my style.

I started by fussy cutting this lovely fairy from the "Summer Dream" patterned paper
from the Fairy Belle collection by Jodie Lee.


I created a very colorful and textured background using a Prima stencil, molding paste 
and lots of mists.  I unfortunately do not own any of the Prima Color Bloom sprays yet, 
but I still wanted to show my mixed media skills.  I am looking forward to 
purchasing them soon as I know that they will be top quality!


I added a whole bouquet of Prima flowers (Bistro - De Soie, Jenuine - Pastel, Flower Market - North Country, Fairy - Sugar Blooms, Cottage Blossoms - Canary, just to name a few!) as well as flowers from Finnabair's Vintage Trinkets line, Wood Icons butterflies, Say It In Crystals Iridiscent Circles, resin Chandelier, a Fairy Belle trinket and lots of Say It In Crystals Gemstones Stickers.


And, before we get on to my other Prima shares, here's one last close-up image of my frame.


Now, in no particular order, let's take a look at some of my favorite Prima-based projects.


When I started scrapbooking a bit over 10 years ago, all I did were double-page layouts,
and I do still enjoy them.  In fact, the one below was just recently published in the Spring issue of Canadian Scrapbooker Magazine.  If I were to design for Prima, I think I could adhere to those scrapbookers who love double-pages and who may be wishing for more double-page inspiration.


Hopefully, I have inspired you to take out your Prima stash and start creating!

Before I go, I want to wish each of my scrappy friends
whose dream it is also to design for Prima all the luck in the world,
and I hohpe that you will do the same for me! :)


Monday, April 20, 2015

Life Is Sweet
(Prima April BAP)


I had time to play along with the Prima April Build-a-Page challenge this month!

This is the beautiful sketch provided as inspiration, designed by a fellow Canadian, Keren Tamir.


My layout is full of shabby chic elements from loads of flowers, 
intricate felt borders and lots of pearly swirls.


I started with the "Pixie" paper from the Jodie Lee Nature Garden Collection,
to which I added some molding paste with the Circular Lattice stencil
and some sprays and white paint to create a pretty mixed media background. 


Below you can see the very pretty Die Cut Art Strips that are made of felt. 
I bought a bunch of different styles a couple months ago and this is my first time using them.
 I love the way they give more texture and dimension to my background. 


You all know that I adore flowers!  When creating any project, my favorite part 
is looking through all my baskets of flowers and picking out the best ones 
to fit the theme and colors of my layout or card or canvas.
I own so many Prima flower packs that I have 2 basket full to the brim that I have
to dig through and every single time I find some treasures that I didn't even realize I owned,
like the kraft-colored Hillsboro Brown Sugar set which holds 48 pieces total!  A must-have!


Even though all the Prima goodies on this layout are absolutely beautiful,
I have to say that this picture of sisterly bond, my friends' daughters 
Celeste and Jade holding hands, is, above all else, the gem of my creation. 


Now let's take a look at all Prima products used:
(I've added links to the Prima website whenever available)
Say It In Pearls
Say It In Crystals
Metal Die - Leaves
Flowers:


Thursday, April 16, 2015

Scrap Around the World Mid-Month Reveal

The mid-month reveal for Scrap Around the World has just gone live!

 The April mood board is full of sea-inspired textures,
colours & elements, designed from Hera Sugitani from Brazil!


Click HERE to view the first of the month reveal 
and HERE for today's mid-month reveal.


This month, I will only be revealing my project on April 24th as
I am 2 of the SATW designers chosen to share with you a special tutorial based
on the current mood board.  For now though, here's a little sneak peak on my project!


Find out all about the challenge HERE and
make sure to familiarize yourself with the challenge rules beforehand.

There are awesome prizes up for grabs from these sponsors:
13@rts
Creative Embellishments
2Crafty Chipboard
7 Dots Studio
UmWowStudio
Danafix France
 Studio75
Scrap-Unlimited
Mixed Media Place
 DT member Jelissa Mei
Scraps of Elegance Kit Club (random prize)

There is also a Follower's Competition Prize
every month sponsored by SA Crafters.

I already shared with you all the details about each prize on my sneak peek
earlier this month, but you can see them all again on the SATW blog 
right HERE along with the mid-month DT reveal.

The deadline for this challenge is April 30th.

Come back on the 24th to see my reveal and photo tutorial!!!